Introduction
In the realm of renewable energy, solar power stands out as a beacon of sustainability. Harnessing the sun’s energy requires meticulous planning and installation, with each component playing a crucial role. One such component often overlooked but essential for solar panel installations is the solar strut channel. In this guide, we delve into the structure and installation process of solar strut channels, shedding light on their significance in solar panel setups.
I. Understanding Solar Strut Channels
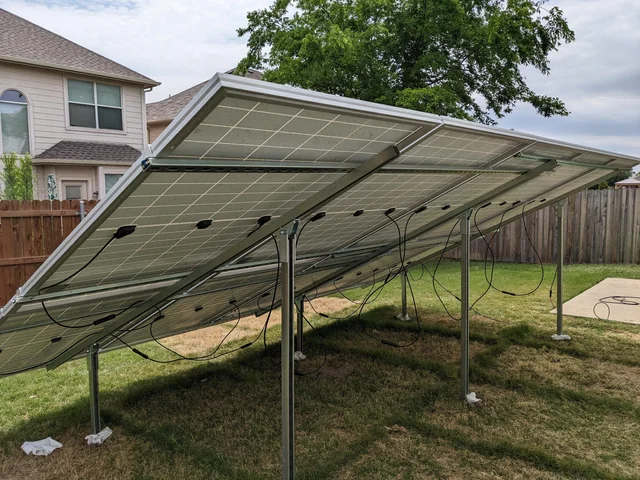
Solar strut channels, also known as solar strut rails or simply strut channels, are integral components in mounting solar panels. They serve as the framework upon which solar panels are securely installed on rooftops or other structures. These channels are typically made of durable materials such as aluminum or galvanized steel, ensuring longevity and stability in various weather conditions.
A. Structural Composition
Material: Aluminum and galvanized steel are the most common materials used in manufacturing solar strut channels. Aluminum offers lightweight and corrosion-resistant properties, ideal for rooftop installations. On the other hand, galvanized steel provides robustness and durability, suitable for ground-mounted solar arrays.
Profile: Solar strut channels come in different profiles, including C-channel, U-channel, and I-beam configurations. The choice of profile depends on factors such as load-bearing capacity, installation method, and structural requirements.
B. Functionality
Support: The primary function of solar strut channels is to provide support for solar panels. They distribute the weight of the panels evenly, minimizing stress on the mounting surface and ensuring long-term stability.
Versatility: Solar strut channels offer versatility in mounting configurations, allowing for adjustable tilt angles and orientation to optimize solar exposure. This flexibility is essential for maximizing energy generation in varying geographic locations.
II. Installation Process
Proper installation of solar strut channels is paramount to the overall performance and longevity of a solar panel system. Here’s a step-by-step guide to installing solar strut channels:
A. Site Assessment
Roof Inspection: Evaluate the mounting surface (roof or ground) for structural integrity, orientation, and potential obstructions such as vents or chimneys.
Solar Access: Assess the site’s solar access to determine the optimal placement of solar panels for maximum sunlight exposure throughout the day.
B. Design and Layout
Mounting Configuration: Based on the site assessment, design the layout of the solar strut channels, considering factors such as panel orientation, tilt angle, and spacing between rows.
Load Calculation: Calculate the load-bearing capacity of the mounting structure to ensure compatibility with the weight of the solar panels and supporting infrastructure.
C. Installation Procedure
Attachment Points: Identify and mark the locations for attaching the solar strut channels to the mounting surface, ensuring proper spacing and alignment.
Fastening: Secure the strut channels using appropriate fasteners such as lag bolts, roof hooks, or concrete anchors, depending on the mounting surface.
Alignment: Verify the alignment and levelness of the strut channels using a spirit level to ensure uniform support for the solar panels.
Panel Mounting: Once the strut channels are securely installed, mount the solar panels onto the channels using mounting clamps or brackets designed for compatibility with the channel profile.
D. Wiring and Final Checks
Wire Management: Route the electrical wiring from the solar panels through the strut channels, ensuring proper insulation and protection against environmental factors.
Grounding: Implement grounding measures as per local electrical codes to mitigate the risk of electrical hazards and ensure system safety.
Quality Assurance: Perform a comprehensive inspection of the entire installation, checking for any loose fasteners, potential hazards, or deviations from the design specifications.
Commissioning: Once the installation passes quality checks, commission the solar panel system by connecting it to the electrical grid or off-grid power storage system.
III. Maintenance and Troubleshooting
Regular maintenance is essential to keep solar strut channels and the overall solar panel system in optimal condition. Here are some maintenance tasks and troubleshooting tips:
A. Inspection
Visual Inspection: Periodically inspect the solar strut channels for signs of corrosion, damage, or loose connections. Address any issues promptly to prevent further damage.
Tightening: Check the tightness of fasteners and mounting hardware regularly, especially after severe weather events or temperature fluctuations.
B. Cleaning
Debris Removal: Clear any debris or vegetation that accumulates on the solar strut channels, as it can obstruct sunlight and affect the efficiency of the solar panels.
Surface Cleaning: Use a mild detergent solution and a soft brush to clean the surface of the strut channels, removing dirt, dust, or bird droppings that may accumulate over time.
C. Troubleshooting
Electrical Issues: If there are issues with solar panel performance, inspect the wiring connections and ensure proper grounding. Check for any shading or obstructions that may affect sunlight exposure.
Structural Integrity: Monitor the structural integrity of the mounting system, especially after extreme weather events such as storms or heavy snowfall. Reinforce or replace damaged components as needed.
Conclusion
Solar strut channels play a vital role in the structural integrity and performance of solar panel installations. Understanding their composition, installation process, and maintenance requirements is essential for ensuring the longevity and efficiency of solar energy systems. By following best practices in design, installation, and maintenance, solar enthusiasts can harness the power of the sun with confidence, contributing to a sustainable energy future.

